| |
Tissue World Americas 2002, Converting & Finishing Workshop
Adding Quality Through Finishing Processes
Carl Ingalls, Embossing Technologies
|
|
| |
Once upon a time, the papermaker made the paper and the converter just
cut it up and packaged it. Sometimes the converter added a few minor
finishing touches to the paper, like calendering. More finishing
processes were added, and now they make a very significant contribution
to the overall quality of the product.
In this paper, a process is a finishing process if it adds value
by changing the intrinsic properties of the paper after papermaking.
Since these processes act directly upon the paper, they must be done
while it is accessible in sheet form - not wound up into a roll or stacked.
On the paper machine, this could be anywhere between the crepe doctor and
the reel. However, most finishing processes would impair efficient operation
of a paper machine. In some cases, a finishing process may be included in
a rewinding operation, but the most common location is on a converting line,
after the parent roll unwind and before winding or folding.
Finishing processes do so much for so little. Since converting lines are
much smaller and slower than paper machines, these processes can add value
to the product at very low cost. Also, a new process can often be added by
simply installing another treatment station in an existing converting machine.
Finishing processes are closer to the end user. They are the last steps in
the sequence of processes that build product properties. Therefore, we will
focus more upon the product properties from the user's perspective than upon
the process mechanics. This paper will introduce the concept of the "finishing
curve", which the author has found to be a powerful tool for maximizing
the value of the finished product, and maintaining the process on target.
Some Common Finishing Processes
- Calendering
improves the surface smoothness of the paper by pressing it between two
smooth cylinders. This is the simplest of the finishing processes, and
is the only one that can be done on the paper machine without seriously
affecting machine efficiency. It is frequently a part of rewinding and
converting operations.
- Embossing
creates bulk and absorbency by passing the paper between two cylinders,
where one or both of the cylinders are engraved with a pattern. This
is probably the most powerful of all of the finishing processes, with
the greatest potential for changing the intrinsic properties of the paper.
It is almost always done in converting.
- Ply bonding and laminating
combine two or more plies of paper into a single sheet, either mechanically
or with an adhesive. Some products are ply-bonded in a rewinder, but this
is done more often in converting. Towel laminating is a special process
that is combined with embossing on a converting line.
- Lotionizing
improves softness by adding a substance to the paper surface. Typical
substances are oils, waxes, or silicones. Application methods vary greatly,
but may include contact methods, such as printing or coating, and spray
methods, such as hydraulic, aerosol, mechanical, or electrostatic. It may
be done in rewinding or in converting, but rarely on a paper machine,
probably due to the risk of contaminating the wet end with the lotion.
- Printing
enhances the appearance of the paper by adding decoration and color.
The two most popular methods are gravure and flexographic. Gravure
printers have been used in rewinding operations. Flexographic printers
are used on converting lines for high quality, multi-color decorating
for consumer towels.
The Intrinsic Properties of the Paper
The product properties most affected by the finishing processes include absorbency,
bulk, strength, handfeel, ply count, and visual appeal. These terms have special
meanings to the tissue paper industry. The converter who understands these properties
and the mechanisms behind them is better able to tune the finishing processes to peak
performance.
The following descriptions of properties were written as an analysis of how the
customer or user experiences the product. What the product does in use is more
important than what the product is. In some cases, this viewpoint may seem strange
to someone who is accustomed to focusing upon how the product is made or tested.
- Absorbency
is the ability to draw and hold a volume of liquid. The material must first be able
to pull the liquid from another surface, and then hold it against other forces such
as gravity. The liquid is held almost entirely within the empty spaces between the
fibers, sometimes called pores, and very little is held inside the fibers. Paper
fibers provide surfaces that attract the liquid, especially when the liquid is water.
The fibers also provide the structural strength to hold these spaces open against
capillary forces. Due to the nature of these forces, small spaces hold small amounts
tightly, and larger spaces hold larger amounts loosely. A well designed distribution
of sizes of these open spaces within the product works best. The smaller pores
contribute to wipe-dry and absorbency rate, while the larger pores provide total
capacity. The volume of liquid that is held by the product is very dependent upon
the magnitude of the forces acting to remove the liquid, forces that are usually
due to acceleration or gravity. A paper towel held gently and horizontally will hold
a lot more water than a paper towel that is shaken or held vertically. Test methods
vary as well, especially in how the water is drained from the sample.
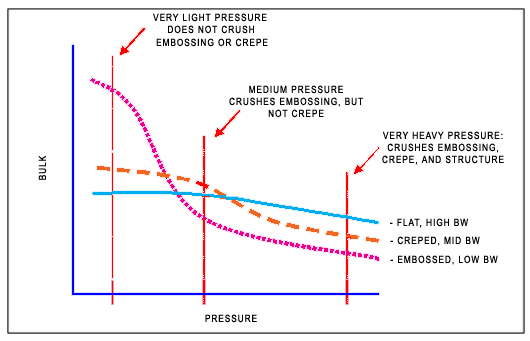
- Bulk
is the capability to occupy space while resisting some amount of pressure. More
bulk makes it possible to design a larger package for the product, which adds to the
perception of value in the consumer market (but not in the institutional or "away
from home" market). It is roughly equivalent to thickness, and is usually measured
as the thickness of a stack of sheets under a standard load. It is extremely sensitive
to the applied pressure, and therefore the ability to resist this pressure is a key
component. Selecting an appropriate pressure for measuring bulk is difficult because
the product is subjected to many different conditions. When this pressure approximates
a person's touch, bulk is closely correlated to the perception of "body".
When the test pressure equals the internal pressure that exists in a firmly wound
roll of product, bulk is an excellent predictor of roll diameter. The best correlation
between bulk and absorbency is achieved when the pressure for the bulk test matches the
average pressure due to capillary forces. Determining the bulk at one pressure does not,
in general, allow one to predict the bulk at significantly different pressures,
especially when products are made in very different ways, as illustrated in Figure 1.
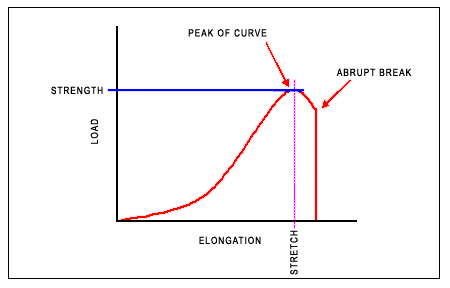
- Strength
is the ability to resist structural failure while subjected to various forces during use.
When wiping up a spill, the paper towel should not leave pieces behind. A sneeze should
not blow holes through the facial tissue. The conditions and forces applied during use
are very complex, and have a strong effect upon how well a product performs. Most paper
products are stronger when pulled in the machine direction (MD) than in the cross
direction (CD), and stronger when wet than when dry. To simplify and standardize, we
normally test the paper in pure tensile mode (a uniform pull), one direction at a time,
all dry or all wet, and continue pulling until it breaks. Initially, the paper's
resisting force is very low and climbs slowly as it is stretched, and then this force
steadily increases to a maximum before it falls off at failure, sometimes abruptly
(see Figure 2). This maximum resisting force is reported as the tensile strength for
a particular condition (dry or wet) and direction (MD or CD).
- Handfeel,
also called softness, may be the most important property of bath tissue and facial
tissue. It is also the most difficult to quantify. It is highly subjective, with
different people disagreeing about what is softer. It is composed of at least
three components: smoothness, cushion, and drape. Although each of these components
can be measured with mechanical devices, they "add together" in a complex
way to form a composite that is sometimes called overall handfeel preference. In
the author's opinion, no mechanical test or combination of mechanical tests has yet
been developed that is as good as a trained human evaluator. However, good handfeel
is a required quality to be considered a premium bath or facial tissue.
- Ply count
is a product property, when considered from the user's perspective. For the converter,
it is just how the product was made. Ply count is an attribute that is usually advertised
on the package, because the user generally believes that more plies means better quality.
If the package says that it is a two-ply product, the user had better find what seems
to be a two-ply product inside, regardless of how it was made. It is very important to
bond the plies properly. If the plies are stuck together so thoroughly that they cannot
be separated anywhere, then the product will be perceived as single ply. If the ply bond
is so weak that the plies separate too easily, or have already separated, then the user
may believe that they were never really attached.
- Visual appeal
is a critical property of quality products. The embossing should look purposeful, and
not as though the product was damaged by a water spill. The printed decorations should
enhance the perception of quality, with clean lines and good registration between colors.
Balancing Properties for Overall Quality
A converter's job is a balancing act. Overall product quality requires a well balanced
blend of properties. Otherwise, the only important properties are the ones that do not
meet expectations. If a bath tissue is not soft enough, then simply making it thicker
or stronger would not add value. However, if the product has adequate or even excess
bulk or strength, then there are finishing processes that can exchange some of that
bulk or strength for handfeel. The improvement in the balance of properties translates
to an improvement in the overall quality and value of the product.
In general, finishing processes add value by trading properties to improve this balance.
In each case, some properties are gained at the expense of others. Different processes
trade different properties at different rates, and they interact with each other as well.
With sufficient understanding of these tradeoffs, the converter may manage the whole system
as if it were a well trained orchestra.
|
|
| |
Adding Value by Trading Properties
The table below shows a summary of the main effects of the most common finishing processes
upon product properties.
|
|
| |
| Process Name |
Added Properties |
Subtracted Properties |
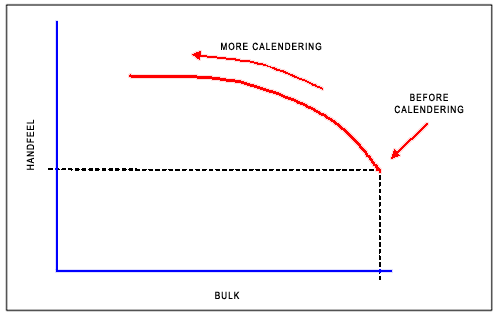
| Calendering |
Handfeel (smoothness) |
Bulk |
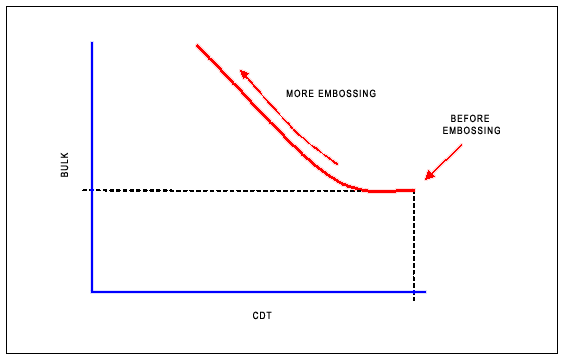
| Embossing |
Bulk
Absorbency (volume)
Handfeel (drape & cushion) |
Strength
Handfeel (smoothness) |
| Ply Bonding and Laminating |
Absorbency (volume)
Handfeel (cushion)
Bulk, in some cases |
Handfeel (drape) |
| Lotionizing |
Handfeel (overall) |
Absorbency (wipe dry) |
| Printing |
Visual Appeal |
Bulk |
|
|
| |
For each process, the properties that are subtracted are like currency,
available to be exchanged for value. The converter needs to know
how to quantify the tradeoffs between product properties for each
process. How much handfeel can be gained by calendering at what
cost in bulk? How much absorbency can be traded for how much strength
when embossing?
In this paper, a tradeoff relationship between properties associated
with a finishing process is called a Finishing Curve. In the case
of calendering, the tradeoff relationship between handfeel and
bulk is a Calendering Curve. For embossing, the tradeoff relationships
between bulk and strength and between absorbency and strength
are Embossing Curves. This concept has been borrowed from papermakers
who use "Technology Curves" to quantify the tradeoff
effects of papermaking processes.
Typical shapes for these Finishing Curves are shown in Figures
3 and 4. The axes on the graphs are shown without numbers because
the actual values vary greatly with different manufacturers, products,
and test methods. The procedure for determining these numbers,
how to quantify a tradeoff relationship for a particular manufacturer
and product, is similar for all of the processes.
Normally, there is a single variable that is the primary process
control for each process that can be continuously varied over
a range. This is usually gap or nip load for calendering and embossing,
and fluid application rate (add-on) for lotionizing. Increasing
this primary variable amplifies the tradeoff between product properties.
Decreasing it diminishes the tradeoff. An example of a primary
process control variable for embossing is shown in Figure 5.
The remaining or secondary process control variables usually affect
the relationship between the primary variable and the product
properties, but they rarely affect the tradeoff relationships
between the properties. This concept is best explained with an
example, which is also illustrated in Figure 6.
In an embossing nip with a steel engraved roller and a smooth
rubber-covered roller, the pressure in the nip is often the primary
control variable, and the hardness of the rubber cover would be
considered a secondary control variable. If nothing else changes,
there is a fixed relationship between the nip pressure and the
amount of bulk gained through embossing, and also a fixed relationship
between nip pressure and the amount of strength lost (as in
Figure 5). However, if the hardness of the rubber cover is changed, these
relationships may change considerably. At the same pressure, less
bulk will be added and less strength will be subtracted when the
rubber cover is harder (see example in Figure 6). Most of the
change introduced by the harder rubber may be compensated by increasing
the nip pressure.
The real question is whether the relationship between bulk and
strength (or bulk gain versus strength loss) has changed. That
question is directly addressed with a finishing curve, an embossing
curve in this case. This is an extremely important point. It is
what makes these finishing curves so useful.
|
|
| |
How to Use a Finishing Curve
As a benchmark. A finishing curve is the best way to
document the "health" of a finishing process in a
specific instance. Tracking changes in the finishing curve over
time can provide advance notice of future problems, which can
then be addressed during scheduled maintenance periods.
For centerlining. A finishing curve can be used as a
process control tool. It can show the normal operating range
as well as the limits of the process.
As a diagnostic. The finishing curve can help
identify the source of an operating problem when it is compared
to a condition in which the system was running well. If the
problem is in the base paper, the finishing curve will clearly
indicate this as well.
For consistency. The finishing curve can be used to
improve consistency or standardization in product made from
different machines and at different sites.
For comparing "apples and oranges". The
finishing curve provides a common basis to evaluate and compare
dissimilar processes and process options, combinations of processes,
or different base sheets.
For process understanding. The finishing curve shows
causality between process, base paper, and product. It shows
what is possible with the process in its current state.
|
|
| |
A Detailed Example: Using a Finishing Curve to Solve a Problem
Creating a finishing curve the first time requires more effort
than later ones, because several decisions need to be made at
the beginning. Also, the first curve establishes many things
about the tradeoff relationship between the properties that
are fairly stable, and therefore may not need to be reconfirmed
every time. Less data will be needed in future curves. With
experience, there are many shortcuts to be found.
The procedure for creating a quantified finishing curve is similar
for all of the finishing processes. Using a specific example
with a fictitious scenario will make it possible to explain
this in greater detail.
Scenario: The product is a single-ply, heavily
embossed bath tissue for the consumer market. The problem is
that the bulk has recently fallen below acceptable levels, causing
"mushy" or loosely wound rolls of product. The base
paper has been recently upgraded, and is therefore a suspect,
even though the "upgrade" has produced higher bulk
from the paper machine. Fortunately, an embossing curve has
been found that was created before the base paper was changed.
Solution plan: Create a new embossing curve with
the new base paper, and compare it with the old one. In both
embossing curves, the tradeoff is between bulk and CD dry tensile
strength (CDT). The primary process control variable is embossing
penetration, which is the distance that one steel engraved
roller has penetrated or enmeshed into the other. More penetration
means more embossing, more bulk gain, and more CDT loss.
Step 1. Select and document the base paper to be used in
this test. It is best to locate a very average and uniform parent
roll. Record complete identification of the parent roll. All
critical properties of the base paper should be tested and recorded.
Always test basis weight, tensile strength in both directions,
and bulk.
Step 2. All extraneous variability should be minimized.
If cross direction variability is a problem, either in the base
paper or in any of the subsequent processes, then all testing
should be done at the same CD positions in the parent roll and
in the product. For embossing, a position which is halfway between
the center of the sheet and either edge works very well. If
MD variability through the parent roll is a problem or is suspected,
then the base paper should be tested more frequently as the
parent roll is consumed. Other processes in the converting line
can mask the effects of the embossing process. These may be
eliminated in this particular case by collecting the embossed
paper directly out of the embossing nip at slow speed.
Step 3. Decide what levels of embossing should be run and
tested. Since an older embossing curve already exists in this
case, three or four levels of embossing should be adequate.
These embossing conditions may be called A, B, C, and D for
labeling purposes. The test range should encompass the normal
operating range, and it should also extend beyond the normal
range in both directions, even if that would result in unacceptable
product.
Step 4. Adjust the embosser to the first penetration
level and run enough paper through the nip for testing. Label
the sample with the embossing condition number and test for
the following properties: basis weight, bulk, and dry tensile
strength in both directions (MDT and CDT). Repeat with every
embossing penetration level. After all samples of base paper
and embossed paper have been collected, the converting machine
may be returned to production.
Step 5. About product property testing. The procedures
for measuring the properties of the base paper and of the embossed
paper should be exactly the same. The bulk test should include
a low pressure bulk test, because that will correlate much better
with how firm a roll of product can be made.
Step 6. Collect the data, preferably in a spreadsheet,
and make a printed copy. The data should include the base paper
properties, treated as if it were just another embossing variant.
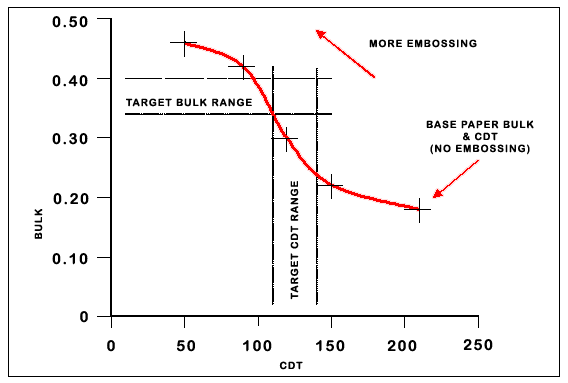
An example is shown in Figure 7.
Step 7. Graph the data, as shown in Figure 8, and make a printed
copy. Make sure that the scales of both axes (bulk and CDT)
for the new graph match the axes on the old graph. Include the
base paper data as part of the curve.
Step 8. Compare the new embossing curve with the old
one. In the example shown in Figure 9, the new curve appears
to be simply shifted to the left (less strength) and up (more
bulk), relative to the old one. The shift almost matches the
difference in base paper properties. However, we see that the
new base paper does not have enough strength to allow the embossing
to work as well. Since such a very large portion of the final
product bulk comes from the embossing, the increase in base
paper bulk is too small to make up for this loss. This is an
example where an increase in the bulk of the base paper does
not translate into an increase in the bulk of the final product.
Problem solution: Increase the strength of the
base paper to previous levels, even if it means reversing the
improvement in base paper bulk.
|
|
| |
CONCLUSIONS
- Use finishing processes to add significant value to tissue products
by improving some properties, the ones that are most needed,
at the expense of others.
- Use a finishing curve to quantify this tradeoff, or improvement
of one property at the expense of another.
- Use finishing curves to better understand how different finishing processes
affect the final product.
- Control the finishing processes by using the finishing curve as a
centerlining or diagnostic tool.
- Quality requires focusing on product properties from the perspective
of the user.
|
|
| |
FIGURES
Figure 1: How Bulk Is Affected by Applied Pressure
Figure 2: Tensile Test Curve
Figure 3: Finishing Curve for Calendering
Figure 4: Finishing Curve for Embossing
Figure 5: Example of a Primary Process Control Variable
Process = Embossing
Primary control = Nip line load (pli)

Figure 6: Effects of a Secondary Process Variable
Process = Embossing
Secondary variable = Rubber hardness
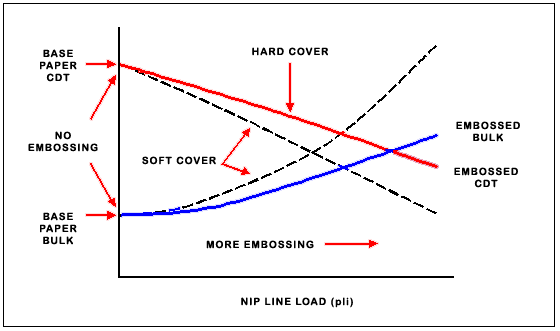
Figure 7: Test Data for Example Problem
|
Embossing Penetration |
CD Tensile Strength |
Bulk (low load) |
Comments |
|
0 |
210 |
0.18 |
Base Paper |
|
0.25 |
150 |
0.22 |
Too Light |
|
0.38 |
120 |
0.30 |
OK |
|
0.50 |
90 |
0.42 |
OK |
|
0.65 |
50 |
0.46 |
Too Heavy |
Figure 8: Finishing Curve for Example Problem
Figure 9: Comparing Curves for Example Problem
This paper was originally published by Paperloop Inc., and was presented
at Tissue World Americas 2002 Exhibition and Conference by Carl
Ingalls on 1 Oct 2002.
|
|
|